

How To Dimension An Ellipse On A Drawing
- Horizon factor
- Freehand
- Ellipse in ellipse
Drawing ELLIPSES
I've been asked on many occasions for assist on drawing a variety of elements inside a cartoon and the Ellipse probably comes top of the list. Ellipses can appear quite daunting at starting time but, similar most problems you will encounter, they can exist broken down into more manageable forms as I shall explicate...
The Ellipse
How accurately must I depict an ellipse?
Very accurately! The centre of the viewer tin detect any irregularity in a shape that information technology fully understands. A "square" that does not have sides of equal length, a "circle" that is not round and an "ellipse" that deviates from perfection is immediately noted as existence not what it claims to exist - or, more precisely, information technology is not what the eye expects to see in that situation and is detected as existence "foreign". In short, a "round" circumvolve is accustomed in passing and the overall reality of the scene is maintained. The same is true of the ellipse.
What is an Ellipse?
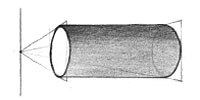
 An ellipse is simply a circle seen in perspective. This is an important concept to proceed in mind.
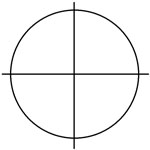
An ellipse, therefore, must conform to the same rules as a circle.
It consists of arcs, it contains no straight lines and, if divided into quarters, each segment is identical to the other three.
Breaking the problem down
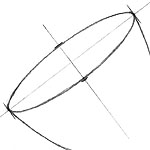
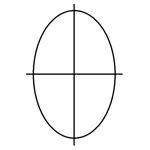 And then, as with the circle, an ellipse contains four identical segments. To study this draw an ellipse using an ellipse template. Or use the circumvolve/ellipse tool of a estimator graphics program to draw one (the basic MS Pigment programme was used here) so print information technology out. Now describe a line vertically through the ellipse to split it as in half so draw some other beyond it. It becomes immediately apparent that each quarter is identical to the others - only the orientation is different. The top left segment is a mirror image of the top right, which is a vertical mirror prototype of the bottom correct segment below it... You've but reduced the problem by three-quarters - it's getting easier past the minute!
Written report the geometry
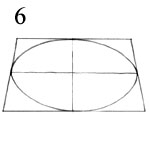
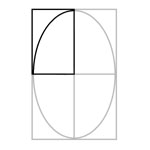 At present let'due south draw a box around our ellipse then we can properly study the geometry of one of those segments. If you're right-handed I suggest you concentrate on the top left - using the natural movement of your wrist, this is the outset arc yous volition want to depict. Observe that both ends are "flat" to the sides of the box - an ellipse never comes to a point at the elevation or bottom. Notice also how the arc, equally it travels from pinnacle to lesser, gently unwinds from a tight to a gentle curve. It does this smoothly with no hint of a direct section - this is, call back, a circle seen in perspective then but curves are involved.
Offset attempts
Proceed your template or computer-fatigued examples handy - they'll help you to draw the correct curves in the following exercises. In time you'll exist able to discard them and depict with understanding but, for at present, I'll allow you to use a crib sheet! We'll beginning by repeating what you've leaned so far just in opposite.
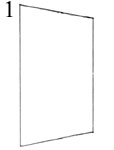
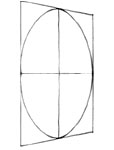
(1)Describe a square in perspective on a vertical plane (y'all will probably find information technology slightly easier to describe vertical ellipses at first). A square about 8cm high by 4cm (3"×1½") will be about right. Continue it minor and then you lot don't need to move your arm during the exercise and you tin can see the upshot without moving your optics.
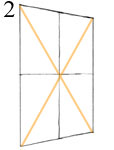
(2)Divide it vertically in half (draw lines connecting contrary corners - where they cantankerous is the true centre.). Then divide it in half horizontally.
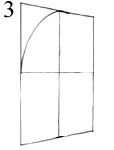 (three)Now allow's get started. We'll begin in the pinnacle left segment but, if you're left-handed, you might adopt to start top correct. Report again the curve that your template produced then try to echo the geometry in your top left segment. Starting almost flat to the top line of the foursquare brainstorm to curve down towards the side'south halfway point, gently lessening the curve as you lot go. Aim to meet the side in the same "flat" manner that yous started. Getting this get-go curve correct is the main trick - everything that follows is just going to be a copy of it.
Hint: As you depict your curve, it ofttimes helps to wait at the spot you lot are aiming for rather than the line y'all are cartoon - await ahead of your pencil betoken to its destination.
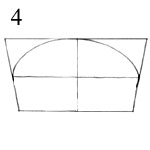
Now plow your paper clockwise through xc° and copy the curve y'all simply drew but in reverse...
...Turn your paper through 90° again and copy the bend you
just drew every bit a mirror image.
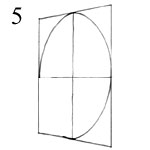
Finally turn your paper once more and in one case more copy, as a mirror image, the bend you lot but drew.
 Does it await right? Well, no - in this case I need to practice a footling more than work - but it's quite presentable for a first attempt. Are at that place any apartment sections? Exercise your lines meet smoothly as they laissez passer from segment to segment? If you are having trouble working out why information technology looks wrong try viewing your ellipse in a mirror or turning it upside down to give your eye a fresh manner of looking at it. If your paper is thin enough to see through when you shine a light through it - fold information technology in half along the horizontal dividing line - the ii halves should lucifer exactly and then it will be like shooting fish in a barrel to spot any errors. Having establish the problem, erase the lines in that surface area leaving just a shadow to guide you. Now redraw to correct the flaw then enquire over again "Does it wait right?" Call back, the eye can always spot a fault with an ellipse and so... If it looks correct, it is correct!
The more you practise, the easier ellipses become to depict. I doubt that'southward it'southward possible to actually describe a perfect ellipse first time just your first attempts will get closer and closer to the finished shape.
The HORIZON factor
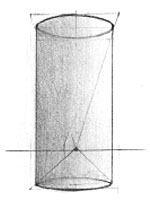
And then far nosotros've just drawn our ellipse as a circle distorted within a square conforming to vertical perspective. But for horizontal ellipses to piece of work correctly you must also take their distance above or below the horizon into account. If yous concur up a can of beans in front of you and lift it above your heart-level (the horizon) you volition be looking under the can; below your eye-level and you will run across information technology from above. Hold information technology direct in front of you and you will see the peak half of the tin can from below and the bottom one-half from above. OK?
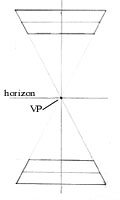
- Gear up your horizon by drawing a horizontal line.
- Define a vanishing point (VP) and describe a vertical line through it.
- Depict two squares of identical width in perspective - one above and 1 below the line.
- Separate these squares in half both ways as you did in the earlier practise.
- Construct ellipses within both squares - turning the paper if information technology helps you to describe them.
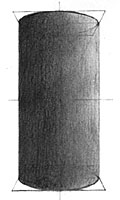
- Now connect the outside edges and add tone to grade a three-dimensional cylinder.


Note how the ellipse "flows" into the side. There is never a sharp join.
Repeat the exercise only move the horizon downwardly.
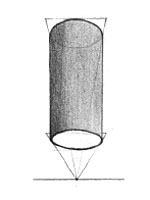
This time driblet the horizon so both squares are above it.
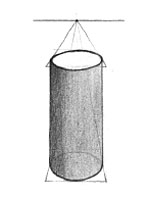
If you invert it, the ellipses are now below the horizon.
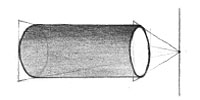
And correct too if turned left...
...or right of your viewing position.
And with practice...
 One time you understand the basic geometry of the curves involved yous will probably find it sufficient to only lightly depict length and width dividers and add points marking the required dimensions.
If yous need to depict actually big ellipses it will often aid yous to describe a smaller version beginning - small plenty so you can see the whole ellipse without having to move your eyes. Y'all tin and then enlarge this onto your final drawing surface (using whatever means you prefer from projection to mechanical resizing) or use it as a visual template to guide you when you lot draw it full size.
Ellipse within ellipse
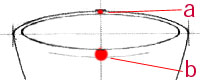 Finally in that location will exist times when you need to draw one ellipse (or more) within another. For example, when drawing a circular, hollow object with walls having a substantial thickness, such as a terra cotta flowerpot. In this particular case you need to draw but the top half of the outer ellipse and to shift the inner ellipse slightly college to account for perspective (the rear wall is farther away than the front and so a is narrower than b). The lower one-half of the outer ellipse needs to exist "seen" merely in your listen as it is solely defined past the lighting and shadow of the forepart face. If you endeavour to draw this line first, withal lightly, you stand a expert take a chance of it remaining to haunt you - even after you've erased it, its slight indentation will probably concenter actress graphite from your shading and be forever nowadays!
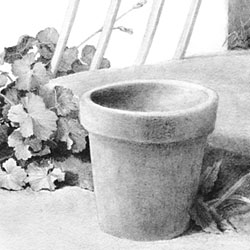
Is this ellipse perfect? No - simply little in life is perfect and pots from kilns often show flaws. In this case I decided the slight skew added to, rather than detracted from, the reality...
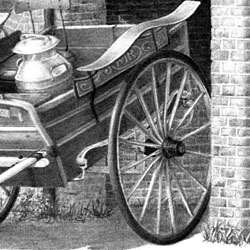
...just here the churn and wheel had to be as perfect equally I could draw them.
Ellipse examples...
Acme TIP
Never undervalue your work - what you accuse indicates to others its worth to you.
Consider these two statements: "I like it but information technology's so cheap information technology probably isn't as good equally I recollect information technology is" and "I don't know why it's so expensive but it must be worth it!". The toll dictates the opinion.
Accuse too little and yous just say "This is the value I put on my work and, personally, I don't call up it's very practiced".

Source: https://sibleyfineart.com/tutorial--draw-ellipses.htm
Posted by: moakcamagirse.blogspot.com
0 Response to "How To Dimension An Ellipse On A Drawing"
Post a Comment